
C++, OpenGL and more...
 Megabyte Softworks Facebook
 Megabyte Softworks Patreon
Hello fellow readers and welcome to the 12th article of my OpenGL4 series! In this one, we will finally get the ability to output some text on the screen without any hassle! So no more setting of the window title with current FPS or anything, we will simply output what we want anywhere we want! Let's learn how to do it  .
.
To achieve our goal, I have decided (again) to go with FreeType Library - library capable of loading and rendering TrueType fonts. It's a pure C library, so it's really easily portable and should work / compile on all major platforms. It's used for rendering fonts at many free Unix OSes and even on Android! So it definitely feels like the best choice. I also had some experience with it from the past (from my job and from my tutorials), so it's easier for me to do something with it rather than starting on a green field .
Before you try to compile this tutorial by yourself, don't forget to update git submodules (to download FreeType as git submodule)! Just call this classic command again:
Now that we have this done, you should be able to compile the project again . Now let's introduce a class, that will hold the FreeType font itself:
class FreeTypeFont
{
public:
	static const int CHARACTERS_TEXTURE_SIZE;
	static const std::string FREETYPE_FONT_PROGRAM_KEY;
	static const std::string FREETYPE_FONT_SAMPLER_KEY;

	FreeTypeFont();
	~FreeTypeFont();

	void addCharacterRange(unsigned int characterFrom, unsigned int characterTo);
	bool loadFont(const std::string& fontFilePath, int pixelSize);

	int getTextWidth(const std::string& text, int pixelSize = -1) const;
	int getTextHeight(int pixelSize = -1) const;
	void setTextColor(const glm::vec4& color);

	template
	void print(int x, int y, const std::string& text, const Args&... args) const
	{
		printInternal(x, y, string_utils::formatString(text.c_str(), args...), -1);
	}

	template
	void printWithCustomSize(int x, int y, int pixelSize, const std::string& text, const Args&... args) const
	{
		print(x, y, text, pixelSize, string_utils::formatString(text.c_str(), args...));
	}

	void deleteFont();

private:
	void printInternal(int x, int y, const std::string& text, int pixelSize) const;

	ShaderProgram& getFreetypeFontShaderProgram() const;
	const Sampler& getFreetypeFontSampler() const;

	struct CharacterProperties {...}
	struct CharacterRange {...}

	bool _isLoaded = false;
	std::vector _characterRanges;
	int _pixelSize;
	glm::vec4 _color = glm::vec4(1.0f, 1.0f, 1.0f, 1.0f);

	std::vector> _textures;
	std::map _characterProperties;
	GLuint _vao;
	VertexBufferObject _vbo;
};
Whoa! What a long class! Indeed, it has pretty decent amount of methods / properties, some of which I have even omitted here at the website. But worry not, I will try to explain the main ideas behind those methods / properties right now. Perhaps the one, where most logic is concentrated is loadFont(), so let's analyze it as first:
bool FreeTypeFont::loadFont(const std::string& fontFilePath, int pixelSize)
{
	if (pixelSize < 1 || pixelSize > CHARACTERS_TEXTURE_SIZE)
	{
		throw std::runtime_error(string_utils::formatString("Cannot load font, because of invalid texture size (must be between 1 and {})", CHARACTERS_TEXTURE_SIZE));
	}

	FT_Library freeTypeLibrary;
	FT_Face freeTypeFace;

	auto ftError = FT_Init_FreeType(&freeTypeLibrary);
	if (ftError) {
		return false;
	}

	ftError = FT_New_Face(freeTypeLibrary, fontFilePath.c_str(), 0, &freeTypeFace);
	if (ftError) {
		return false;
	}

	FT_Set_Pixel_Sizes(freeTypeFace, 0, pixelSize);
	_pixelSize = pixelSize;

    // ...
}
This function takes two parameters - path to the font that will be loaded and pixel size of the loaded characters. Our ultimate goal is to load every single character as a grayscale and store it within a texture. But it would be a bit of a waste to use different textures for different characters (re-binding textures is costly operation), so I have decided to create several big textures, that contain multiple stored characters. Such textures are also called texture atlases, because it's basically like atlas of multiple textures. Here is an example of texture atlas, that I am generating in this tutorial:
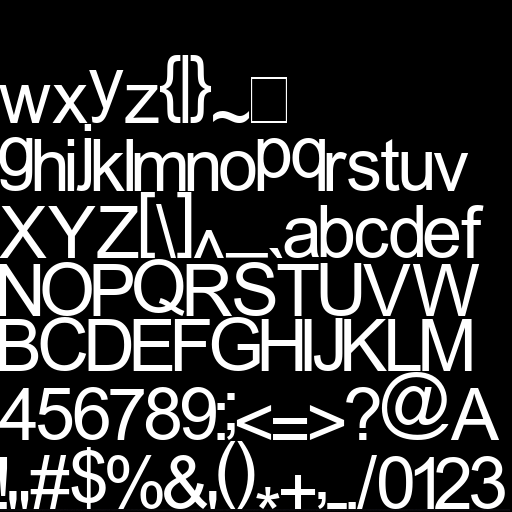
You can see, that I am storing every ASCII character there and then I somehow use it to render the text. Of course, having just texture is not enough we need some metadata about characters (we will get to that soon).
So let's focus again on the code. First line is just a safety check, that we cannot load fonts with pixel size less than 1 and also not greater than CHARACTERS_TEXTURE_SIZE. This constant defines size of one texture atlas, in my case, I chose 512px. So this means, that my character size can be at most 512px, otherwise a single character would not even fit into the texture (but you can increase this number to fit your needs, anyway having such font would be unusual  ). Afterwards, you can see, that we need to call several FreeType functions to load the font - FT_Init_FreeType to initialize the library itself, FT_New_Face to load the font data into the memory and finally FT_Set_Pixel_Sizes to set the desired loaded font pixel size.
These have been like very basic steps, let's go further now:
bool FreeTypeFont::loadFont(const std::string& fontFilePath, int pixelSize)
{
	// ...

	std::vector textureData(CHARACTERS_TEXTURE_SIZE*CHARACTERS_TEXTURE_SIZE, 0);
	auto currentPixelPositionRow = 0;
	auto currentPixelPositionCol = 0;
	auto rowHeight = 0;
	auto currentRenderIndex = 0;
	std::unique_ptr texture = std::make_unique();

	glGenVertexArrays(1, &_vao);
	glBindVertexArray(_vao);
	_vbo.createVBO();
	_vbo.bindVBO();

	auto finalizeTexture = [this, &texture, &textureData](bool createNext)
	{
		texture->createFromData(textureData.data(), CHARACTERS_TEXTURE_SIZE, CHARACTERS_TEXTURE_SIZE, 1, true);
		_textures.push_back(std::move(texture));
		if (createNext)
		{
			texture = std::make_unique();
			memset(textureData.data(), 0, textureData.size());
		}
	};

    // ...
}
There are several variables, that we will be using to load the font. Most important is textureData, which is just basically raw data buffer, that will hold our texture data. Then we have several counter variables, to keep track of where in the texture atlas shall we generate next character. We also have to initialize our VAO and VBO for font rendering. The very last step is a lambda function, that finalizes texture - what I mean with this is, that if we don't fit all the characters into one texture, we have to create several of them. So I've created like a local function, that finalizes the texture and initializes data for another, if needed. This local function to finalize the texture is called in two places, so that's why I've created it as a local lambda function, to avoid copy & pasting code .
Let's go through the actual loading of character data now:
bool FreeTypeFont::loadFont(const std::string& fontFilePath, int pixelSize)
{
	// ...

	for (const auto& characterRange : _characterRanges)
	{
		for (auto c = characterRange.characterCodeFrom; c <= characterRange.characterCodeTo;)
		{
			FT_Load_Glyph(freeTypeFace, FT_Get_Char_Index(freeTypeFace, c), FT_LOAD_DEFAULT);
			FT_Render_Glyph(freeTypeFace->glyph, FT_RENDER_MODE_NORMAL);

			const auto* ptrBitmap = &freeTypeFace->glyph->bitmap;
			const int bmpWidth = ptrBitmap->width;
			const int bmpHeight = ptrBitmap->rows;
			const auto rowsLeft = CHARACTERS_TEXTURE_SIZE - currentPixelPositionRow;
			const auto colsLeft = CHARACTERS_TEXTURE_SIZE - currentPixelPositionCol;

			rowHeight = std::max(rowHeight, int(bmpHeight));

			if (colsLeft < bmpWidth)
			{
				currentPixelPositionCol = 0;
				currentPixelPositionRow += rowHeight + 1;
				rowHeight = 0;
				continue;
			}

			if (rowsLeft < bmpHeight)
			{
				finalizeTexture(true);
				currentPixelPositionCol = 0;
				currentPixelPositionRow = 0;
				rowHeight = 0;
				continue;
			}

			// ...
		}
	}

    // ...
}
Why do we even have two for loops in the first place? Well, I've kinda prepared the code already for the future font tutorial, where we can render arbitrary characters from arbitrary languages, so every font holds a list of character ranges, that we load. For now, there is only one range by default and that's plain ASCII (unicode code points 32-128), which contain english alphabet and most special signs. The inner for loop is just looping through that range.
Now that we're loading character with unicode code point c, we have to call two FreeType functions - FT_Load_Glyph() and FT_Render_Glyph(). First one loads the character into the FreeType's internal structures and the second one renders it into the memory buffer, which we will use now. The code that follows uses rendered bitmap data and builds our texture atlas character by character. Those two if conditions are just to ensure, that we are not too far within one row in the texture atlas and that we haven't ran out of space in the texture completely - in that case, we can just create another texture (notice the signature of the inner for loop - I increase the c variable only if I really build the character manually) and repeat the whole loop from start. Let's see what happens next:
bool FreeTypeFont::loadFont(const std::string& fontFilePath, int pixelSize)
{
	// ...

	for (const auto& characterRange : _characterRanges)
	{
		for (auto c = characterRange.characterCodeFrom; c <= characterRange.characterCodeTo;)
		{
			// ...

			// This also creates entry, if it does not exist
			auto& charProps = _characterProperties[c];
			charProps.characterCode = c;
			charProps.width = freeTypeFace->glyph->metrics.width >> 6;
			charProps.bearingX = freeTypeFace->glyph->metrics.horiBearingX >> 6;
			charProps.advanceX = freeTypeFace->glyph->metrics.horiAdvance >> 6;
			charProps.height = freeTypeFace->glyph->metrics.height >> 6;
			charProps.bearingY = freeTypeFace->glyph->metrics.horiBearingY >> 6;

			if (bmpWidth == 0 && bmpHeight == 0)
			{
				charProps.renderIndex = -1;
				charProps.textureIndex = -1;
				c++;
				continue;
			}

			for (auto i = 0; i < bmpHeight; i++)
			{
				int globalRow = currentPixelPositionRow + i;
				int reversedRow = bmpHeight - i - 1;
				memcpy(textureData.data() + globalRow * CHARACTERS_TEXTURE_SIZE + currentPixelPositionCol,
					ptrBitmap->buffer + reversedRow * bmpWidth,
					bmpWidth);
			}

			// ...
		}
	}

    // ...
}
Those few lines copy metadata about the characters into our internal structure called CharacterProperties. FreeType defines several metrics, that are used to measure the characters, let's have a look at them:

My code does nothing more but copies those metrics into my own structure. Notice the right binary shift by 6 by every number. For some reason, FreeType measures stuff in 1/64th of a pixel. So to get the actual pixel values, we have to multiply the numbers, that are coming from FreeType with number 64 or do the right binary shift by 6, which does the same, but should be a bit faster . After this, we copy the rendered character data from FreeType into our texture data buffer using old good memcpy function.
What remains is to generate the data used to render that character, so let's have a look at this now:
bool FreeTypeFont::loadFont(const std::string& fontFilePath, int pixelSize)
{
	// ...

	for (const auto& characterRange : _characterRanges)
	{
		for (auto c = characterRange.characterCodeFrom; c <= characterRange.characterCodeTo;)
		{
			// ...

			glm::vec2 vertices[] =
			{
				glm::vec2(float(charProps.bearingX),
					float(charProps.bearingY)),
				glm::vec2(float(charProps.bearingX),
					float(charProps.bearingY - charProps.height)),
				glm::vec2(float(bmpWidth + charProps.bearingX),
					float(charProps.bearingY)),
				glm::vec2(float(bmpWidth + charProps.bearingX),
					float(charProps.bearingY - charProps.height))
			};

			glm::vec2 textureCoordinates[] =
			{
				glm::vec2(float(currentPixelPositionCol) / float(CHARACTERS_TEXTURE_SIZE),
					float(currentPixelPositionRow + bmpHeight) / float(CHARACTERS_TEXTURE_SIZE)),
				glm::vec2(float(currentPixelPositionCol) / float(CHARACTERS_TEXTURE_SIZE),
					float(currentPixelPositionRow) / float(CHARACTERS_TEXTURE_SIZE)),
				glm::vec2(float(currentPixelPositionCol + bmpWidth) / float(CHARACTERS_TEXTURE_SIZE),
					float(currentPixelPositionRow + bmpHeight) / float(CHARACTERS_TEXTURE_SIZE)),
				glm::vec2(float(currentPixelPositionCol + bmpWidth) / float(CHARACTERS_TEXTURE_SIZE),
					float(currentPixelPositionRow) / float(CHARACTERS_TEXTURE_SIZE))
			};

			for (int i = 0; i < 4; i++)
			{
				_vbo.addData(&vertices[i], sizeof(glm::vec2));
				_vbo.addData(&textureCoordinates[i], sizeof(glm::vec2));
			}

			charProps.renderIndex = currentRenderIndex;
			charProps.textureIndex = _textures.size();
			currentPixelPositionCol += bmpWidth + 1;
			currentRenderIndex += 4;
			c++;
		}
	}

    // ...
}
With really correct understanding of the FreeType Glyph Metrics (see the provided link for even more information), we can build a small quad made out of the triangle strip to render a single character! Moreover, using the current position in our texture atlas and the metrics of the current character, we can easily generate the texture coordinates too! All those data are then copied into our VBO. We also have to remember the index, where this particular character starts within the VBO. This is being tracked with variable currentRenderIndex, which is at the end updated for every character. Character also remembers, in which texture is it stored (as I said, there can be several texture atlases holding all characters).
After all the character from all character ranges have been loaded, it's time for some final steps:
bool FreeTypeFont::loadFont(const std::string& fontFilePath, int pixelSize)
{
	// ...

	if (currentPixelPositionRow > 0 || currentPixelPositionCol > 0) {
		finalizeTexture(false);
	}

	_vbo.uploadDataToGPU(GL_STATIC_DRAW);
	// Setup vertex positions pointers
	glEnableVertexAttribArray(0);
	glVertexAttribPointer(0, 2, GL_FLOAT, GL_FALSE, sizeof(glm::vec2)*2, reinterpret_cast(0));

	// Setup texture coordinates pointers
	glEnableVertexAttribArray(1);
	glVertexAttribPointer(1, 2, GL_FLOAT, GL_FALSE, sizeof(glm::vec2)*2, reinterpret_cast(sizeof(glm::vec2)));

	// Now we're done with loading, release FreeType structures
	FT_Done_Face(freeTypeFace);
	FT_Done_FreeType(freeTypeLibrary);

	_isLoaded = true;
	return true;
}
There is not much more left that we have to do. First of all, we have to finalize the latest texture, but only if it's needed and it's not empty. Furthermore, we have to set up vertex pointers and store them within our VAO, as we usually do. It's polite to clean-up after ourselves, so we also de-initialize the FreeType library using two functions - FT_Done_Face, which de-initializes our loaded font and FT_Done_FreeType to signalize, that we are done and FreeType can release whatever it had to allocate under its hood .
And that's it, that's the loading of the font! I haven't explained it like line by line, I left some investigation for the reader. To summarize the main idea - we have to create texture atlases containing characters, that we want to render and along with the textures we need to remember, how exactly to use those textures for rendering. That's the great picture  .
.
Now it's time to go through the printing code itself, so let's analyze the printInternal function:
void FreeTypeFont::printInternal(int x, int y, const std::string& text, int pixelSize) const
{
	// Don't print, if the font hasn't been loaded successfully
	if (!_isLoaded) {
		return;
	}

	glDisable(GL_DEPTH_TEST);
	glDepthMask(0);
	glEnable(GL_BLEND);
	glBlendFunc(GL_SRC_ALPHA, GL_ONE_MINUS_SRC_ALPHA);

	auto& shaderProgram = getFreetypeFontShaderProgram();
	shaderProgram.useProgram();
	shaderProgram[ShaderConstants::projectionMatrix()] = MatrixManager::getInstance().getOrthoProjectionMatrix();
	shaderProgram[ShaderConstants::color()] = _color;

	getFreetypeFontSampler().bind();
	shaderProgram[ShaderConstants::sampler()] = 0;

	glm::vec2 currentPos(x, y);
	const auto usedPixelSize = pixelSize == -1 ? _pixelSize : pixelSize;
	auto lastBoundTextureIndex = -1;
	const auto scale = float(usedPixelSize) / float(_pixelSize);

	glBindVertexArray(_vao);
	for(const auto& c : text)
	{
		if (c == '\n' || c == '\r')
		{
			currentPos.x = float(x);
			currentPos.y -= float(usedPixelSize);
			continue;
		}

		// If we somehow stumble upon unknown character, ignore it
		if (_characterProperties.count(c) == 0) {
			continue;
		}

		const auto& props = _characterProperties.at(c);
		if (props.renderIndex != -1)
		{
			if (lastBoundTextureIndex != props.textureIndex)
			{
				lastBoundTextureIndex = props.textureIndex;
				_textures.at(props.textureIndex)->bind();
			}

			glm::mat4 model = glm::translate(glm::mat4(1.0f), glm::vec3(currentPos.x, currentPos.y, 0.0f));
			model = glm::scale(model, glm::vec3(scale, scale, 1.0f));
			shaderProgram[ShaderConstants::modelMatrix()] = model;
			glDrawArrays(GL_TRIANGLE_STRIP, props.renderIndex, 4);
		}

		currentPos.x += props.advanceX*scale;
	}

	glDisable(GL_BLEND);
	glDepthMask(1);
	glEnable(GL_DEPTH_TEST);
}
At the very beginning, we are doing three important things - disabling depth test (so that font gets printed over the scene no matter what), disabling writing to depth mask (because we don't care anymore about what will be in the depth buffer - the font is printed after the scene has been rendered) and also enabling blending, just as in the 009.) Orthographic 2D Projection tutorial, where we have implemented our first HUD. Then we have to prepare shader program, at least what we already know we can do, like setting projection matrix and font color. I also calculate the ratio factor (scale) of the pixel size one wants to render with against pixel size the font has been loaded with. This way one can easily use different pixel sizes.
Now we're ready to actually render the font by iterating through all the characters in the string to be printed. If the character is a newline, then we move our position variable to the beginning of the next line. Otherwise we try to render the character. Sometimes, the character does not even need to be rendered (like space), despite that fact we have to advance our position. So we render the character only if it's visible. All the character data, like vertex positions or texture coordinates are already stored. We just have to know, where among the VBO is that particular character stored, but that is exactly purpose of renderIndex variable! And if it's not -1, then it's something we have to render . At the end of every character render, we advance our horizontal position with the line using FreeType advanceX metric.
At the end of the font printing, all we have to do is to restore the old state - disable the blending and re-enabling depth test and writing to the depth buffer.
There are many other functions defined in the FreeTypeFont class. I will show some of them here just to give you a big picture. I will not explain them very much in detail, most of them are pretty self explanatory, if you look at the code :
The shader program for rendering font is not much different from the shader program used for orthographic 2D rendering. The only thing that's changed is the fragment shader part. Let's see:
#version 440 core

layout(location = 0) out vec4 outputColor;

smooth in vec2 ioVertexTexCoord;

uniform sampler2D sampler;
uniform vec4 color;

void main()
{
	vec4 texel = texture(sampler, ioVertexTexCoord);
	texel = vec4(texel.r, texel.r, texel.r, texel.r);
	if(texel.a == 0.0) {
		discard;
	}
	outputColor = texel*color;
}
Because our texture is just luminance (grayscale) data, we take the first (red) texel and extend it to full vec4. If alpha is 0.0, we can immediately discard the fragment, it's invisible anyway. After that, we just combine font color with the retrieved texel .
As in the 010.) First Great Refactoring tutorial, I have decided to create a class, that is responsible for creating, maintaining and releasing fonts. This class is called FreeTypeFontManager and has very similar structure to other managers.
There is also a new HUD class version, that supports printing, but in a fancy way! We can now use the font dimensions, provided by the FreeTypeFont class to be able to render the font also from the top of the screen or from the right of the screen without having to calculate the correct position! I won't go that much into detail, but now we can render text in the HUD classes like this:
void HUD012::renderHUD() const
{
	printBuilder().print(10, 10, "FPS: {}", _window.getFPS());
	printBuilder().print(10, 40, "Vertical Synchronization: {} (Press F3 to toggle)",
        _window.isVerticalSynchronizationEnabled() ? "On" : "Off");

	printBuilder()
		.fromRight()
		.fromBottom()
		.print(10, 10, "www.mbsoftworks.sk");
}
Which is really convenient and cool! It might look like a bit of over-engineering to create something like print builder class for printing simple text, but really - now you can print from wherever with whichever parameters without too much problems! And you can combine those methods in any way to achieve the desired printing result (from right, from top, from left, from bottom, with that color etc...) - this way of programming is also called Fluent Interface, you can check it out .
The result of our hard work is really cool! Now we're really able to render text in an easy and convenient way:
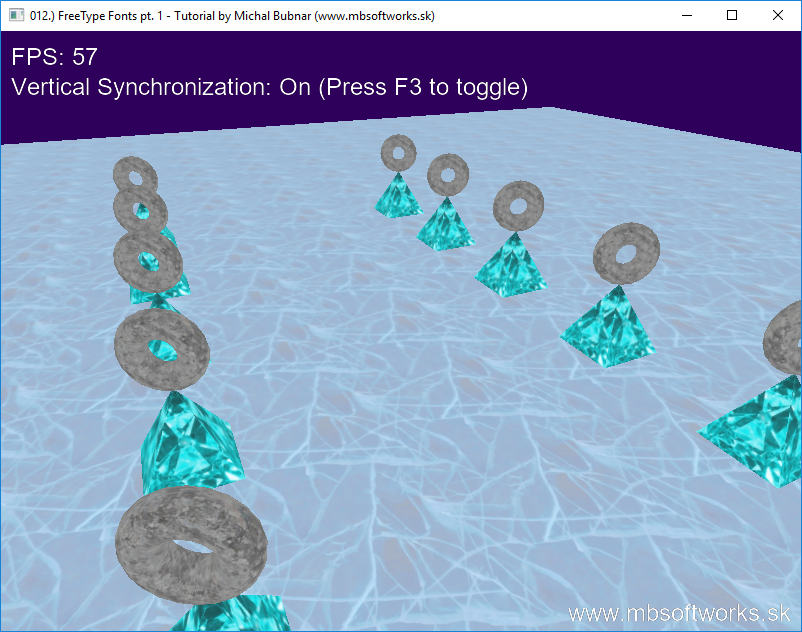
From now on, we will be able to output many things that we're doing. I'm so glad that this tutorial is over, because it took me a lot of time to write this correctly and lots of research to implement the font rendering really well. Although there still might be a room for improvement, I think the main part is done and the result speaks for itself . I haven't explained everything in much detail, but there are honestly so many implementation details, that writing such article would take me forever. And a bit of self-study never hurted anyone . Anyway, I hope you've enjoyed this tutorial and if there's anything you can't wrap your head around , write me any questions .
 Download 2.55 MB (1212 downloads)